
Most modern guitar pedals have one thing in common: an indicator LED. This LED allows you to know whether the effect is engaged or bypassed. In this article, we go over everything you need to know about the indicator LED circuit for guitar effects pedals.
As a member of the Reverb Partner Program and as an Amazon Associate, StompboxElectronics earns from, and is supported by, qualifying purchases.
Disclaimer: Stompbox Electronics and/or the author of this article is/are not responsible for any mishaps that occur as a result of applying this content.
The Diode: A Review
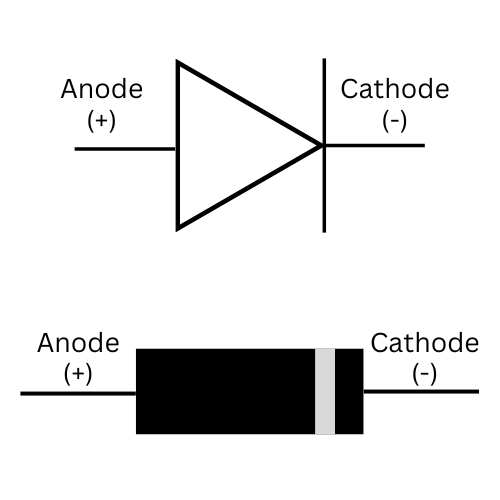
LED stands for Light Emitting Diode. The word “diode” should be familiar: we saw how those work in Circuit #5: The Diode Protectors. Diodes allow current to travel in one direction: from the anode (positive terminal) to the cathode (negative terminal).
Here’s a reminder of how to read the diode symbol in electrical schematics:
LEDs Explained
An LED is simply a diode that emits light. It has an anode (positive lead) and a cathode (negative lead), just like a normal diode.
The schematic symbol for an LED is similar to a normal diode, except for the addition of one or two arrows indicating the emission of light.

LED Characteristics
When ordering LEDs there are a few characteristics you may need to specify. They include:
- Lens Type: Clear vs. Diffused
- Color
- Mounting Style
LED Lens Type: Clear vs. Diffused
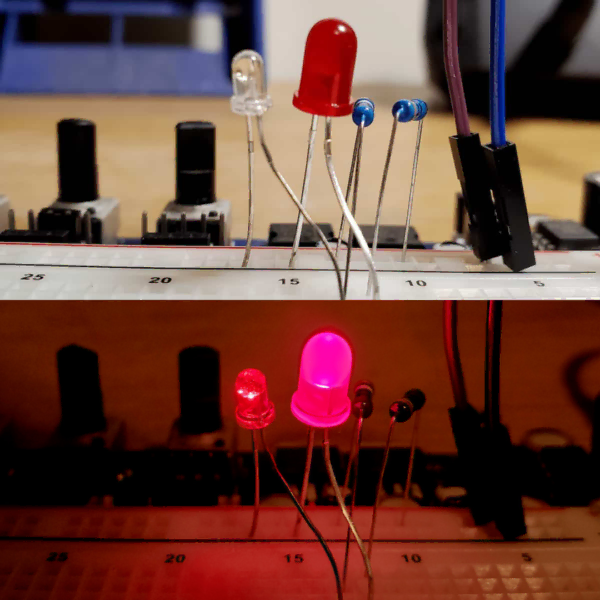
The light-emitting part of the LED is encased in an epoxy lens, which is either clear or diffused (dyed) with a particular color. The diffused epoxy serves to spread out the light for a more even illumination.
LED Color
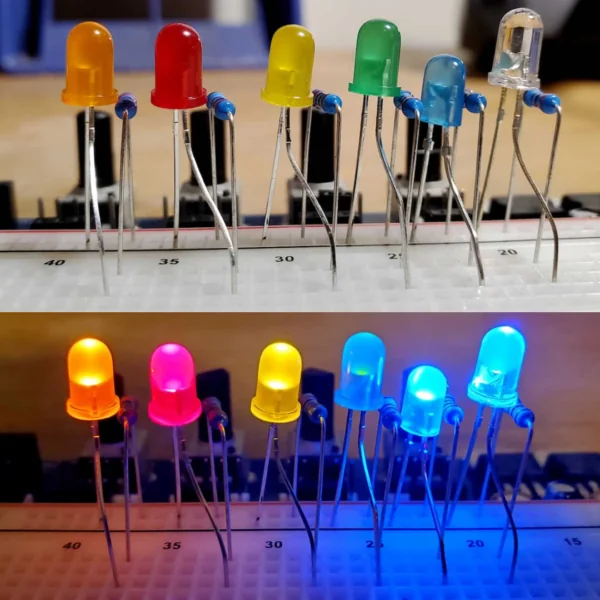
Regardless of whether you have a clear or diffused LED, every LED comes with a particular color. The materials used to manufacture the diode junction determine it’s color.
The most common LED colors are:
- White
- Red
- Green
- Orange
- Yellow
- Blue
- Violet
LED Mounting Style: Through-Hole vs. Surface-Mount
Generally, LEDs come in two types of packages: through-hole or surface-mount. For guitar effects circuits you will almost always use through-hole LEDs. Some mini-style pedals use the surface-mount style due to their small size.
Mounting Through-Hole LEDs
Through-hole LEDs have metal leads that can be inserted into a circuit board for soldering. The basic structure of a through-hole LED involves just two leads, one for the anode and the other for the cathode.
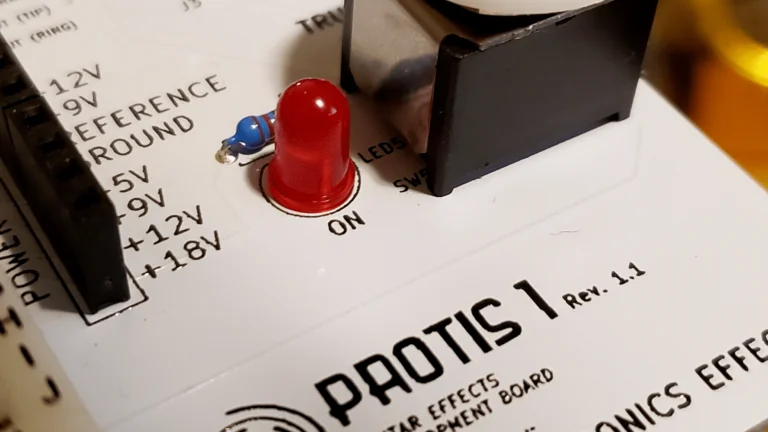
Through-hole LEDs are sized based on the circumference of the lens. The most common sizes are 5mm and 3mm. Usually, builders use 3mm or 5mm LED bezels for mounting through-hole LEDs onto an enclosure. In this case, an LED adapter board can be used for wiring.
Mounting Surface-Mount LEDs
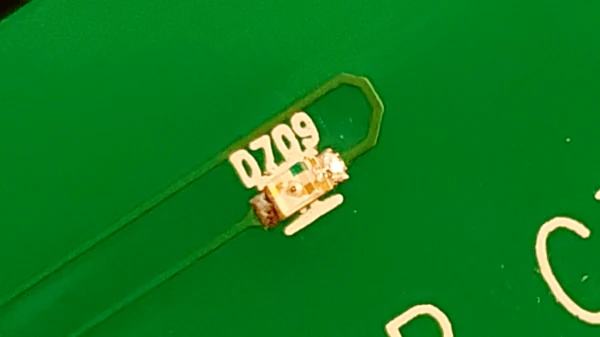
Surface-Mount LEDs, on the other hand, are much more compact. Instead of metal leads, they have two pads. Just like through-hole LEDs, one pad is for the anode and the other for the cathode.
Through-hole LEDs have the advantage of being naturally anchored in place, since they are mounted through holes. Soldering surface-mount LEDs require a different approach. You need to hold the component in place with a pair of tweezers and solder one pad at a time.
LED Polarity
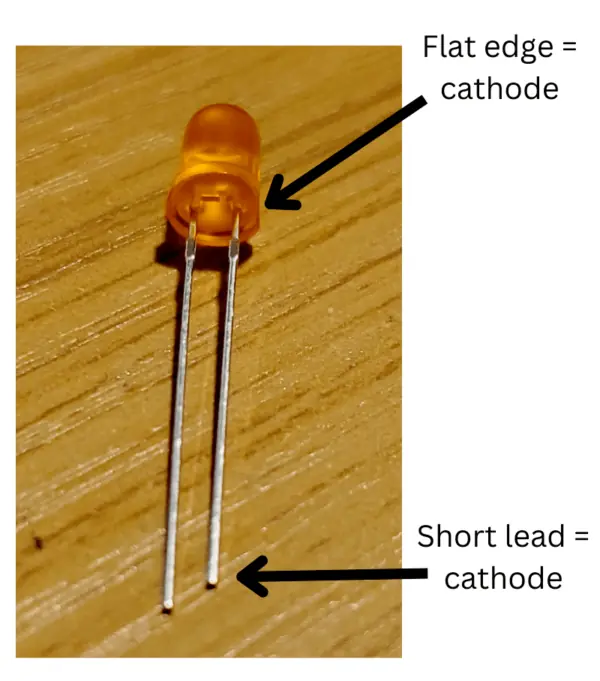
There are a few ways to tell which leads are positive or negative, depending on the type of LED. The negative side of a through-hole LED is marked with a flat edge and is the shortest of the two leads.
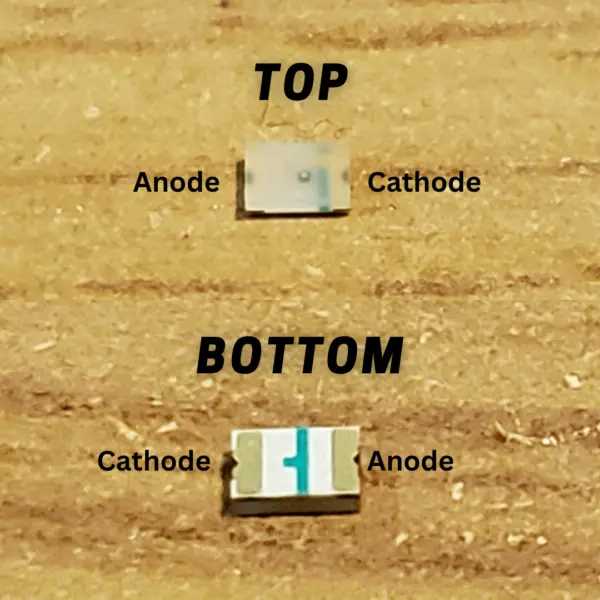
Surface-Mount LEDs are much smaller and compact, so it can be difficult to distinguish certain features. For surface-mount LEDs, the negative end is usually marked with a notch or dot. For models with clear packaging, a short green line marks the negative end.
Electrical Characteristics of LEDs
The most important electrical characteristics are:
- Forward Voltage
- Reverse Voltage
- Forward Current
- Luminous Intensity.
Each of these characteristics are important in their own way. The forward voltage is important for circuit calculations. Knowing the reverse voltage helps you determine the point at which an LED will fail if powered with the wrong polarity power supply. The forward current allows you to protect the LED from excessive current, while the luminous intensity gives you a potential reference for knowing how bright a given LED will be.
Forward Voltage
In Circuit 5: the Diode Protectors, we found that diodes tend to have a standard Forward Voltage drop when current flows through them. For a standard silicon diode, it’s about 0.65V. This 0.65V number comes from the material used to manufacture the diode (namely, silicon). LEDs are built from different variations of semiconductor materials, and therefore have different forward voltage values.
You can measure the forward voltage drop of your LED using a multimeter, set up in “diode” mode.
Below is a table of approximate forward voltage values according to LED color. These values are not standardized across the industry, so the actual voltage measurement may differ quite a bit from these values.
| LED Color | Forward Voltage (V) |
|---|---|
| Red LED | 1.8V |
| Yellow LED | 2.2V |
| Green LED | 3.5V |
| Orange LED | 2.0V |
| Blue LED | 3.6V |
| Violet LED | 3.3V |
Reverse Voltage
You can burn out and destroy an LED by applying a reverse voltage to it. The reverse voltage is the maximum voltage level an LED can withstand in the reverse polarity. Always check the polarity of the LED before hooking it up to your circuit.
Forward Current
Forward current is the current flowing in the forward direction of an LED (from anode to cathode). If too much forward current flows through the LED it can break down and burn out.
It follows that one of the most important things to do when designing an indicator LED circuit is to limit the current flowing through it with a current limiting resistor. We’ll see how that’s done later!
Luminous Intensity
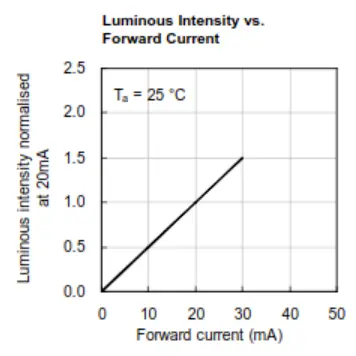
Sometimes the datasheet for an LED has a chart titled something like Luminous Intensity vs. Forward Current. It gives you a visual representation, helping you determine how luminous, or bright, the LED will shine based on the amount of forward current flowing through it.
Figure 8.9 shows an example of such a chart from the datasheet for a Kingbright WP7113SRD/E:
Designing the LED Circuit
In general, an LED indicator circuit is super simple. It requires just two components: an LED and a resistor. The resistor in an LED circuit is often referred to as a Current-Limiting Resistor (CLR) because it limits the forward current through the LED.
For a 9VDC circuit, typical values for the CLR are between 1kΩ and 4.7kΩ. To be honest, that’s about all you need to design an LED indicator circuit.
However, if you want to design the circuit to a preferred level of brightness, then a little more work is required. There are four steps to designing an indicator circuit to dial in your desired brightness:
- Determine the Supply Voltage
- Choose a Starting Forward Current
- Determine the LED’s Forward Voltage
- Calculate the Current Limiting Resistor (CLR)
Note: Usually a resistance value in the low kilohms (between 1kΩ and 4.7kΩ) is a suitable choice for a current limiting resistor (CLR). If you’d like a more experimental approach to selecting one, based on brightness level, read on.
Step 1: Determine the Supply Voltage
The most convenient voltage to use for your LED circuit is the supply voltage. That is, the voltage that’s powering the rest of your guitar pedal design. For most pedals that will be 9V, though some are 12V and others are 18V. It depends entirely on your design.
In this example, we’ll use 9V since that’s the most common.
Step 2: Choose a Starting Forward Current
If you look at the Y-axis label in Figure 8.9 (above) you will notice that the luminous intensity was “normalized” to 20mA. That means the manufacturer used 20mA as a reference point for measuring the brightness of the LED.
That means that they found the LED was half as bright at 10mA, and 1.5x as bright at 30mA.
Let’s write down 20mA as a starting point.
Step 3: Determine the LED’s Forward Voltage
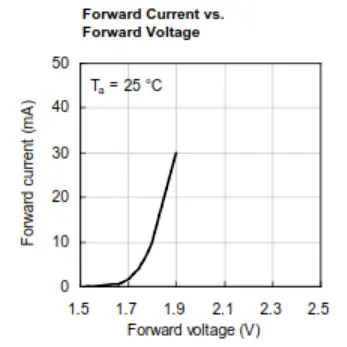
In our example, we have a red LED. You can use the 1.8V value from the table above or, for a little more accuracy, you can use the Forward Current vs. Forward Voltage chart in Figure 8.10 (below).
First, find 20mA on the Y-axis. Then drag your finger to the right until it hits the black line. From there, move your finger down. In this case, you should end up at about 1.85V. This means that, with 20mA of current flowing through the LED, 1.85V will appear across it’s terminals.
Step 4: Calculate the Current Limiting Resistor (CLR)
A Current Limiting Resistor (CLR) is a resistor used to limit the current flowing through an LED. This is required for most LED circuits to prevent the burn out of the LED from excessive Forward Current.
You can calculate the CLR’s value with Equation 8.1:

Alternatively, you can use the Stompbox Electronics online CLR resistance calculator.
In our example, we get a CLR resistance of (9 – 1.85) / 0.02 = 357 Ω. This isn’t a standard resistance value, so you might want to use a combination of resistor values in parallel or series to achieve that resistance.
Combining resistors is often unnecessary, especially for such a simple circuit. A much better recommendation is to use the next highest standard value (390Ω, in this case).
How to Change the LED Brightness
If the LED is too bright, then you can increase the resistance of the CLR until you have your desired brightness level.
Once you end up with what you like you might want to jot down the relative luminosity value. Doing so can help you determine a better starting point for calculating the resistor value for other LED colors.
To find the relative luminosity value, first calculate the forward current at your desired brightness level using Equation 8.2:

Once you have the forward current, refer to the plot in Figure 8.9 and find the relative luminosity value.
For our example, let’s say we ended up liking the brightness level at 1kΩ, instead of the 357Ω we started with. The approximate Forward Current at 1kΩ is (9 – 1.85) / 1000 = 7.15mA. Looking at how 7.15mA lines up on the chart gives us about 0.4 relative luminosity. So in the future, pick a CLR value based on a relative luminosity of 0.4.
Of course, that’s only if the luminosity is available in the LED’s datasheet. If you don’t have access to these values, then you can simply experiment with different resistor values and see which value you like!
Indicator LED Circuit Schematic
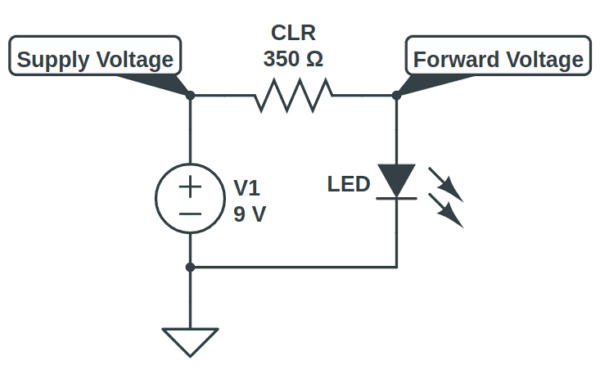
Now that we have an idea of where to start, we can build the LED indicator circuit. Figure 8.11 shows a testing circuit to use for your indicator LED.
Measure the forward voltage by setting your multimeter to voltage mode. Then, measure across the anode and cathode of the LED. The red probe of the multimeter should be placed on the anode, while the black probe is placed on the cathode. The value that appears is the forward voltage of the LED.
Indicator LED Wiring for Guitar Pedals
In older vintage guitar pedals the indicator LED might be always-on, telling us that power is being applied to the pedal (the big box EHX Deluxe Memory Man is an immediate example). In most cases, you probably want the LED to indicate whether the pedal is “engaged” or “disengaged”, not “powered” or “dead”.
To do this, a switch is introduced between ground and the current limiting LED circuit. The most straight-forward example is with a 3PDT switch, which we saw in Circuit 1: The True Bypass.

LED Indicator Circuit Parts List
Use the following parts to experiment with different LED current limiting circuits.
Remember: do not apply power across an LED without a current limiting resistor and respect the maximum current rating!
| Parts | Qty |
|---|---|
| Red LED | 1 |
| Yellow LED | 1 |
| Green LED | 1 |
| Orange LED | 1 |
| 1k Ohm Resistor | 2 |
| 2.2k Ohm Resistor | 1 |
| 4.7k Ohm Resistor | 1 |
| 10k Ohm Resistor | 1 |
Guitar Effects Design in 48 Circuits or Less
The 48 Circuits or Less article series serves to close the gap between DIY guitar effects design and guitarists interested in the craft by uniquely curating the most important aspects of DIY guitar effect circuit design. This post is part of the 48 Circuits or Less series. View more articles in this series here.
Meet the Author:

Hi, I’m Dominic. By day, I’m an engineer. By night, I repair and modify guitar effects! Since 2017, I’ve been independently modifying and repairing guitar effects and audio equipment under Mimmotronics Effects in Western New York. After coming out with a series of guitar effects development boards, I decided the next step is to support that community through content on what I’ve learned through the years. Writing about electronics gives me great joy, particularly because I love seeing what others do with the knowledge they gain about guitar effects and audio circuits. Feel free to reach out using the contact form!
The Tools I Use
As a member of Amazon Associates, Stompbox Electronics earns and is supported by qualifying purchases.


