
Is your BOSS DS-1 not working? Before you decide to scrap it or sell it for parts, consider this troubleshooting guide.
We’ll look at common problems with the BOSS DS-1 distortion pedal, as well as common solutions to those problems. Hopefully stepping through this process will get you closer to a working BOSS DS-1!

As a member of the Reverb Partner Program, eBay Partner Network, and as an Amazon Associate, StompboxElectronics earns from, and is supported by, qualifying purchases.
Disclaimer: Stompbox Electronics and/or the author of this article is/are not responsible for any mishaps that occur as a result of applying this content.
Getting the Schematic
The first thing you should do before you go deep into repairing a pedal is dig up its’ schematic. Here is the service manual for the BOSS DS-1, which includes the DS-1 schematic. There are two versions of the DS-1 circuit. You will need to know which version DS-1 you have in order to know which schematic to use.
Simple DS-1 Problems
The following are a few “DS-1 not working” problems that are on the simple side. These typically include solutions that avoid having to open the backplate of the pedal.
Effects Sounds “Weak” and LED Barely Lights Up
This is a common symptom of BOSS pedal owners using a PSA adapter with an ACA version. The DS-1 pedals that take an ACA power adapter expect an unregulated 12Vdc at the power connector, but the PSA adapter supplies just 9Vdc.
The fix for this involves three options:
- Use an ACA power adapter
- Use a 12Vdc isolated output (like the one provided by a Voodoo Labs ISO 5)
- Have your DS-1 modified with the ACA to PSA Mod
I’ve written an entire article on the ACA to PSA mod, it’s worth checking out if this symptom pertains to you. If you’d like to send your pedal in to have this modification done, simply fill out the Custom Modification Request Form.
High-Pitched Noise
If you are hearing a high pitched squealing noise come from your DS-1, check to make sure you’re using the correct power supply.
Many power supplies are switch-mode power supplies, which means they utilize high-frequency electronic switching to achieve power conversion from AC to DC. If the power supply you are using for your DS-1 was not built with audio in mind then there is a good chance that the high-pitched sound is coming from there.
The fix is to use the power supply recommended for the version of DS-1 that you have.
Intermediate DS-1 Problems
Intermediate problems involve having to open the pedal up in order to fix an issue. The following are some common problems I’ve encountered whose solutions you might find useful.
Crackling Noise when Turning Knobs
Your pedal may be working just fine, except for when you change settings. Turning the Drive, Level, or Tone knobs creates a whooshing, crackling, or ruffling sound. Usually the remedy for this type of problem is simple: contact cleaner. I’ve personally always used DeoxIT contact cleaner.

Note: Do not, I repeat do NOT, use WD-40 to clean potentiometer or electrical switch contacts. WD-40 may work for a few weeks, but over time the residue will become gummy and attract dirt and dust – things you don’t want in your electrical connections.
To apply contact cleaner to your potentiometers, first open the backplate of your pedal. Remove the knobs and all the nuts holding in the potentiometers and input/output jacks.
Next, gently remove the circuit board from the enclosure. Be careful, as there will be two wires still connected to the footswitch, tethering the circuit board to the enclosure. This is fine – we just need to be able to reach the potentiometers for what we’re doing.
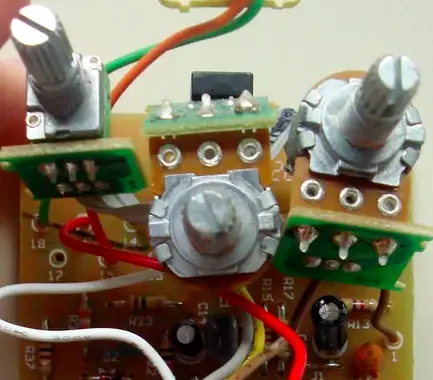
On most potentiometers, there is an opening in the metal can just under the lugs. Aim the contact cleaner spray nozzle into the opening and depress the trigger in short bursts. Turn the potentiometer shaft multiple times, then repeat.

Do this until you can easily rotate the potentiometer back and forth. Clean the excess fluid with a paper towel and let it sit on a towel for 15-30 minutes before reassembling the pedal. Hopefully that gets rid of the crackling!
Pedal Works, But Only Intermittently
Basically, the problem is that the signal cuts in and out, causing the pedal to only work intermittently. This could be a whole host of issues, so let’s tackle the things to look for one at a time:
Check for Loose Wires
There are a lot of wires in BOSS pedals. For example: the ribbon cables connecting mother and daughter boards, the potentiometer wiring, internal cabling for input/output jacks, footswitch, LED, and power connector wiring.
Search for any corroded wires or any wires hanging by a single strand. Sections of a ribbon cable might be getting pulled in one way or the other, forcing one of the wires on the ends to become loose. BOSS pedals are notorious for the wires on the PCB board to become loose. Meticulously check all wire connections.
If you happen to find a loose wire, there are a few options you have. The first is to simply strip back the wire using a pair of wire cutters and resolder it in. There are some cases where that won’t fly.
For example, what if the wire isn’t long enough to strip back and make the connection? In that case, you will need to replace the entire wire. The same goes for when the wire is part of a ribbon cable. You’ll either need to replace the entire ribbon cable, or replace it with individual wires as a “quick” fix.
Check for Corroded Contacts
On old pedals, the contacts on the input or output jacks can become corroded. This could happen due to natural oxidation, or if the pedal was exposed to a wet or humid environment. Checking for corroded contacts is a simple visual inspection of the inside of the input, output and power connectors.
If you find any rust, the best thing to do is replace the entire jack. That’s especially the case for power connectors, since it’s usually difficult to clean the internal contacts.
Smallbear Electronics sells replacements for BOSS parts, including a common type of power connector. They also sell 14-conductor ribbon cable (here) and similar jack replacements for inputs/outputs.
Check for Cold Solder Joints
“Cold” solder joints are simply solder junctions that have cracked in such a way so as to stop making a solid connection to the circuit board. They can be extremely hard to spot, so if you have a magnifying glass, that will help.
A basic inspection consists of examining the soldered side of the PCB. Here’s a photo of a cold joint I found on a BOSS GEB-7 once:
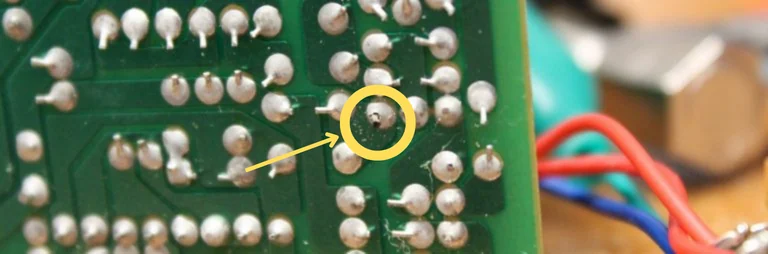
The remedy for a cold solder joint is to simply resolder it. It might help to resolder it twice, removing the “old” solder with soldering wick.
Advanced DS-1 Problems
If you’ve already run through the solutions in the simple and intermediate stages above, then the problem may require more advanced methods. Below are some solutions to common problems for the BOSS DS-1.
Loud Low-Frequency Hum, Increases with Distortion
A loud, low-frequency hum is characteristic of the 60Hz frequency from the wall outlet entering the pedal in some way. First, make sure you’re using the correct power supply. If that’s all good, then most probably the power filter capacitor is the source of the problem.
For the DS-1, electrolytic capacitor C23 (100uF, 16V) is responsible for removing any frequencies that could show up on the power line, as well as stabilizing the power rails. Inspect that cap, replace it with an equivalent part, and hopefully that will solve your issue.
Stuck in Bypass Mode, Won’t Engage
No matter how much you stomp, the DS-1 just won’t switch to engaged mode. Either that, or it starts out in engaged mode and won’t go back to bypass mode. There are a number of things that could be awry in this scenario. Let’s visit them one by one.
Power & Input Plug Connected
The DS-1 can’t power on if there isn’t a plug inserted into its’ input jack. So, before we do anything, ensure that this requirement is satisfied. Also, once again, make sure you’re using the correct power supply for your version of DS-1.
Switch Wires
The next thing you’ll want to check is the integrity of the footswitch wiring. There are two wires that serve to connect the footswitch to the circuit board (terminals 16 and 17 on the schematic).

If any of the footswitch wires are compromised then the signal to switch between engaged and bypass is not reaching the circuit board. Make sure those are okay before continuing.
Check the Reverse Polarity Diode
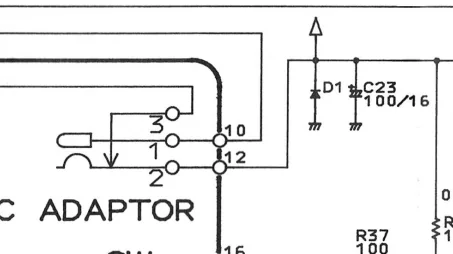
If the DS-1 is suspected to have taken a power supply with a reversed polarity (i.e. center positive), then it is possible that the reverse polarity protection diode is damaged. Sometimes you can tell by simply looking at it, as in the photo below.
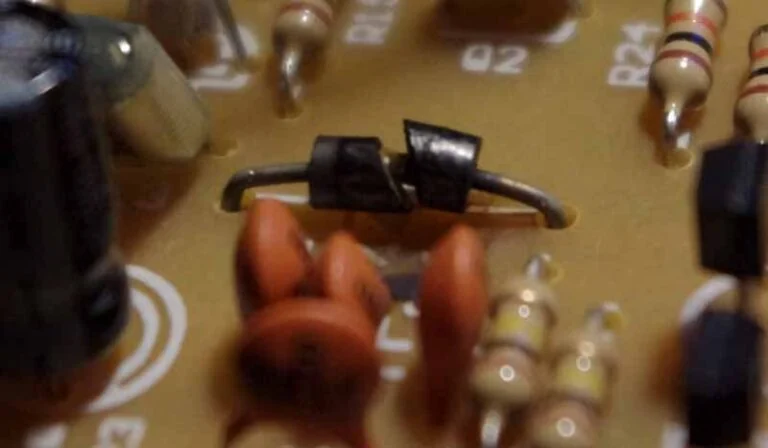
Other times, you’ll simply want to remove the diode and check it with a continuity test. A diode should only conduct current from the anode to the cathode. If it conducts both ways, then it’s bad. If it doesn’t conduct from anode to cathode, then replace it and check operation. You can get a replacement reverse polarity protection diode easily from Amazon.
For the DS-1, the reverse polarity diode is labeled D1 on both schematics. If you have the ACA version of the DS-1, you may also want to check diode D3.
Check the Switching Transistors
The DS-1 uses the standard transistor flip-flop circuit to switch between engaged and bypassed states. If the pedal is not switching between states, you will want to make sure these are operating correctly.
The transistors into question here are Q4 and Q5. The most robust way to test Q4 and Q5 is to take them out of the circuit and test them with a multimeter.
The LED Turns On, But There’s No Sound
The pedal toggles between engaged and bypassed modes, but when the pedal is engaged there’s no sound output, even though the LED turns on!
As in the other cases, the cause could be a variety of things. First, review the above recommendations for intermediate problems. Particularly checking for cold solder joints, corroded contacts, and loose wires.
Once those are covered and you’ve done a good job at examining the pedal for those issues, read on.
Cracked Circuit Board or Copper Traces
Sometimes the copper traces on the board can sever or crack apart. Examine every copper trace in the pedal. It helps to use a continuity tester to verify point-to-point connections. The fix for a cracked trace is to “bandage” it up with a jumper wire.
Audio Probe the Pedal
By far the best thing you can do at this point is to use an audio probe. Using an audio probe to test a circuit is an extremely useful skill, but you will need some tools. First, you need to have a signal generator, which you can connect to the input of the DS-1. Second, you will need an audio probe.
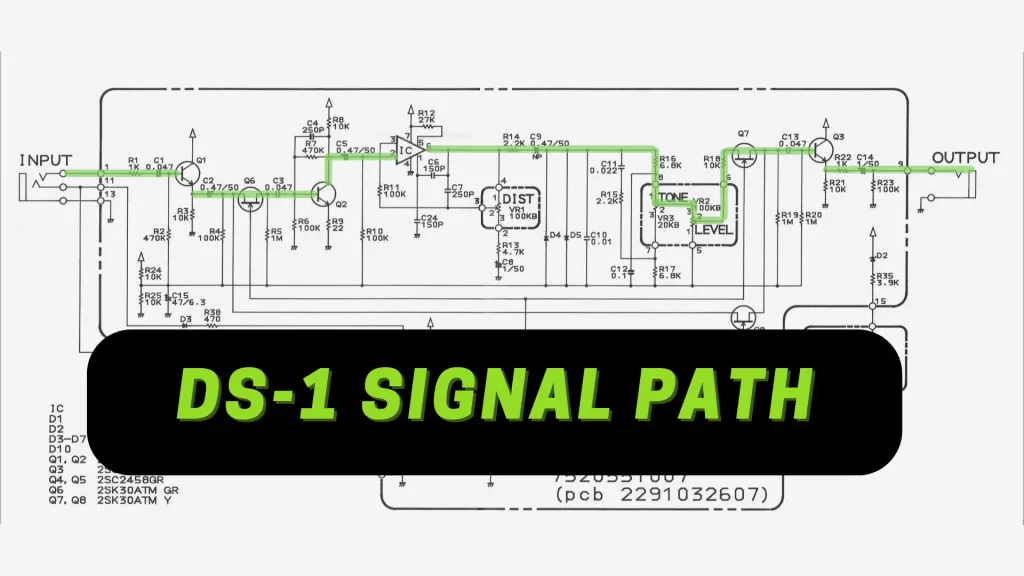
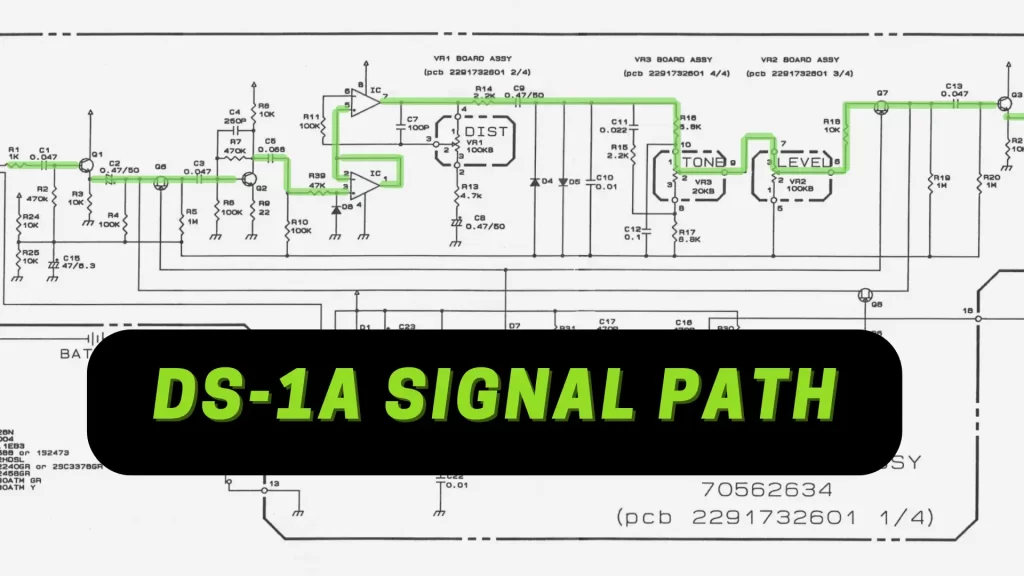
To probe the DS-1 circuit, follow the signal path through the pedal and listen using your amplifier. Start at the input jack and test for the presence of the signal coming from your signal generator. Then, test the base of Q1. Third, test the emitter of Q1, etc. Follow the signal all the way until you can’t hear it anymore. Then, assess the possible problem from there.
Here are the signal paths for both the DS-1 and the DS-1A versions of the circuit:
Meet the Author:

Hi, I’m Dominic. By day, I’m an engineer. By night, I repair and modify guitar effects! Since 2017, I’ve been independently modifying and repairing guitar effects and audio equipment under Mimmotronics Effects in Western New York. After coming out with a series of guitar effects development boards, I decided the next step is to support that community through content on what I’ve learned through the years. Writing about electronics gives me great joy, particularly because I love seeing what others do with the knowledge they gain about guitar effects and audio circuits. Feel free to reach out using the contact form!
The Tools I Use
As a member of Amazon Associates, Stompbox Electronics earns and is supported by qualifying purchases.


