

There are two main concerns for storing components: space and time. We want to save space so our work area isn’t so cluttered. We want to save time when searching for the proper component value or during clean-up. In this article we’ll cover a few ways to store resistors for working with DIY guitar effects.

As a member of the Reverb Partner Program, eBay Partner Network, and as an Amazon Associate, StompboxElectronics earns from, and is supported by, qualifying purchases.
Disclaimer: Stompbox Electronics and/or the author of this article is/are not responsible for any mishaps that occur as a result of applying this content.
3 Efficient Ways to Store Resistors
Three main choices for organizing resistors are using a component organizer, using envelopes, and using binder sleeves. Each system is described below:
1. Save Space with a Component Organizer
If you’re concerned with space, then you’ll probably want to minimize the number of doors you use in your component organizer. A great way to do this is to use an EIA E-Series standard values list.
For example, here are the values for the E12 system:
| 10 | 12 | 15 | 18 | 22 | 27 | 33 | 39 | 47 | 56 | 68 | 82 |
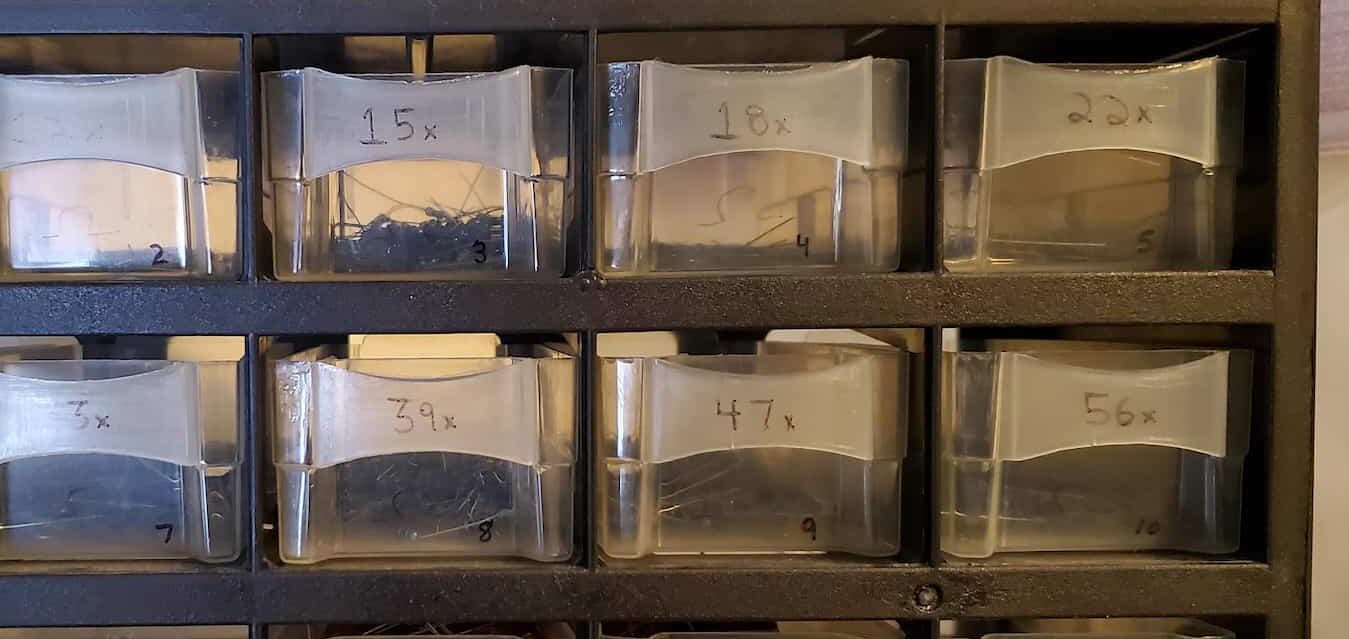
For the method I’ve put into practice, each door gets an EIA number followed by an “x” (10x, 12x, etc.). With this naming convention, all resistor values that start with 10 (10 ohms, 100 ohms, 1kohms, 10kohms, etc.) go in the “10x” door. Likewise, any resistor starting with 22 (22 ohms, 220 ohms, 2.2k ohms, etc.) will be binned in the “22x” door.
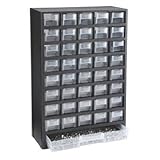
I use a Storehouse 40-bin Organizer, pictured below. It has 40 pull-out bins and the depth is small enough to fit on my bench. Perfect for my needs, and you can find it on Amazon.
Finding Specific Value Resistors
In this system, finding resistors is straight-forward. Let’s say you’re looking for a 5.6k ohm resistor. Right away, you know to look in the bin labeled “56x”. That’s it! You don’t need to do anything else.
Putting Resistors Away
When I’m finished breadboarding on the development board, I’ll want to put resistors back into their respective bins.
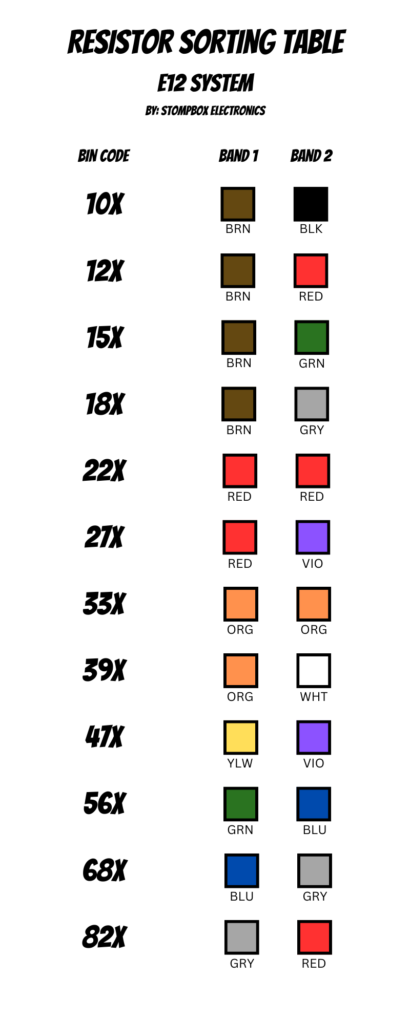
To sort the resistors, I only need to look at the first two color bands. For example, if I’m sorting a 100k ohm resistor I only need to know that “10” is one brown stripe followed by one black stripe. Knowing that, I can identify all the resistors that need to go in the 10x bin.
So the process is to match the first two color bands on each resistor to the number printed on the bin. After a while I got used to the color codes, but if you’re just starting out it can take some time! Instead, you can use the following visual aid to help speed the process along.
Print or download the following E12 Resistor Sorting Table PDF here.
Storing Other Resistor Values
I only used the E12 standard because I initially purchased resistors within that set of values. In case you have resistor values in the E24 standard, you can easily extend this method to the E24 numbering scheme. Here are the values in the E24 system:
| 10 | 11 | 12 | 13 | 15 | 16 | 18 | 20 | 22 | 24 | 27 | 30 |
| 33 | 36 | 39 | 43 | 47 | 51 | 56 | 62 | 68 | 75 | 82 | 91 |
And if you have resistors outside those standard values, you can always use a more flexible method, like seed envelopes!
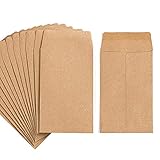
2. Store Resistors in Seed Envelopes
If you don’t have the space for a component organizer, then you might want to look into storing your resistors in seed envelopes – also referred to as coin envelopes.

Why Use Seed Envelopes to Store Resistors?
Flexibility. With seed envelopes, you don’t have to worry about binning resistors by some arbitrary system. Instead, when you have a new value to store you can simply pull out a new envelope, label it, and put it in a box. As a result, using seed envelopes for storing resistors is a flexible way to do so and allows for customizability.
You can get seed envelopes on Amazon from a place called Homtable. They come in quantities of 100, 200, 500, or 1000 and are about 2.25″×3.5″ (5.7cm x 8.9cm).
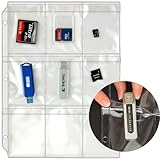
3. Using Binders for Resistor Storage
Another space-saving method for storing resistors is to use binders. Using a 9-sleeve translucent binder sheet, you can build your own “library” of resistors.
The recommended storage sheets are the StoreSMART Plastic Binder Sheets, which have 9 pockets with an inside capacity of 2 5/8″ x 3 7/16″ (6.6cm x 8.73cm) and little flaps so the resistors don’t fall out. The standard business card is about 2″ x 3.5″ (5.08cm x 8.8cm), so with a little trimming you can use blank business cards as inserts to label each packet.
Additionally, if you have resistors of different tolerances (1%, 5%, etc.) or different types (metal film vs. carbon film) you can separate them using table of contents separators.


Here’s a list of materials you may need for binder-based resistor storage:
Meet the Author:

Hi, I’m Dominic. By day, I’m an engineer. By night, I repair and modify guitar effects! Since 2017, I’ve been independently modifying and repairing guitar effects and audio equipment under Mimmotronics Effects in Western New York. After coming out with a series of guitar effects development boards, I decided the next step is to support that community through content on what I’ve learned through the years. Writing about electronics gives me great joy, particularly because I love seeing what others do with the knowledge they gain about guitar effects and audio circuits. Feel free to reach out using the contact form!
The Tools I Use
As a member of Amazon Associates, Stompbox Electronics earns and is supported by qualifying purchases.


